Wednesday, August 27, 2008

MC3

I've been itching to try out this receipe (from L) for the longest time... and everytime I start to prepare the ingredients, I always seem to find that I am lacking something! First it was the butter, then the caster sugar. I'm quite tired of my sloppy grocery shopping!

Last weekend, I made sure I got everything jotted down and headed to the supermarket.

And finally, I managed to bake my MC3 during the closing ceremony of the Beijing Olympics!

Just in case you were wondering... MC3 = Macadamia Chocolate Chip Cookies :D


Ingredients:

1) 1/2 cup caster sugar

2) 1/2 cup brown sugar

3) 1 1/2 cup flour

4) 250g butter

5) 1 egg, beaten

6) 1 tsp vanilla essence

7) 1 cup chocolate chips

8) 1/2 cup macadamia nuts (roughly chopped)


Directions:

1) In a large mixing bowl, cream the butter

2) Mix the caster sugar and brown sugar into the cream mixture

3) In a small bowl, beat the egg and add in the vanilla essence

4) Add the egg and vanilla essence into butter and sugar mixture

5) Stir all together and mix well

6) Slowly stir in the flour, making sure to blend and cream it thoroughly

7) Fold in the chocolate chips and macadamia nuts

8) Drop the dough into a baking tray and place it in a preheated oven at 190 degrees until lightly browned

**Note: If you crave for Subway-like cookie, bake it for about 8 minutes. If you want a crispier cookie, bake it for about 10-15 minutes.

The verdict? Everyone liked it!!!!
As I made both the softer version as well as the crispier version, I could please everyone! Some liked it soft and some liked it crispy!

P/s: Just curious... How do ppl make cookies in the form of cute and nice shapes? My mixture melted when it was in the oven and the cookie came out in one big piece! I had to snap and break them apart! But nonetheless it was great!!

Labels:

Friday, June 06, 2008

Okonomiyaki - お好み焼き

After my short trip to Japan, I couldn't really get the Japanese bug off me.

A brief explanation of what Okonomiyaki is from wikipedia...

Okonomiyaki is a Japanese dish consisting of a pan-fried batter cake and various ingredients. Okonomi means "what you like" or "what you want", and yaki means "grilled" or "cooked" ; thus, the name of this dish means "cook what you like". In Japan, okonomiyaki is mainly associated with Kansai or Hiroshima areas, but is widely available throughout the country. Toppings and batters tend to vary according to region.

And since my fridge didn't have any thing I could not add in "various ingredients". I contemplated to add in chicken drums, but I reckoned that it would be a tad troublesome. I either had to peel the meat off the drums and put it in my pancake or I could just have them separate. Of course, as usual, I chose the easier option - Separate :)

My "cook without an oven" version of okonomiyaki (modified from daintybites)


Ingredients

1 cup flour
1 cup water
1/2 tsp salt
1/2 tsp seasoning (I put in some miscellaneous seasoning, whatever that I had, and I can't even remember what it was)
1 lightly beaten egg
bacon bits (I added this as there was absolutely nothing in my fridge. Not even cabbage)
mayonnaise
okonomiyaki sauce
katsuobushi

Directions
1) Mix the flour, water, salt, seasoning
2) Add the egg, making sure the egg is well mixed into the mixture
3) Add in the bacon bits

* I thought the mixture was a bit too watery and so I added slightly more flour in the process

4) Heat up the pan with oil
5) Pour the mixture in and turn it over after it turns golden brown.
6) When ready to serve, drizzle heaps of okonomiyaki sauce, mayonnaise and katsuobushi and its good to eat!!

I realised that it doesn't really matter what the proportions are, as the okonomiyaki sauce, mayonnaise and katsuobushi is really where all the flavour of the pancake comes from! :)

I prepared a few drums of teriyaki chicken to eat together with the pancake.

R's verdict? Yummy! Can consider adding some ingredients in the pancake the next time round

Labels:

Wednesday, January 02, 2008

Milk and Coffee

I was thrilled when I saw such a unique recipe from Piggy's Cooking Journal and the first thing I reached home was to go make a list of what I needed and head down to the supermarket! :)

Both R and I are coffee drinkers, so that explains my enthusiasm.


Its quite easy to make, but I would definitely love the coffee taste to be stronger than the milk. But nonetheless, it was quite refreshing and it gave me new ideas to play around with. So do keep a look out for new variations of this recipe :)


Method:

1. Prepare approximately 1 cup (250ml) of black coffee with sugar (For me, it would be approximately 2 teaspoons of coffee powder with 4 sachets of sugar, as I use sugar in packets.. :p)
2. Stir in 1.5tbsp of gelatin powder while the coffee is still hot
3. Let it cool to room temperature then keep the mixture in the fridge and let it set
4. Remove the mixture from the fridge and cut it into cubes
5. Pour milk into a glass and scoop a few spoonfuls of coffee jelly into the glass
R's Verdict? Pass! Refreshing and Unique

Labels:

Monday, May 29, 2006

Japanese Fare

I has been 3 weeks since I started on my cooking "experiments" and I must admit that it gets a little addictive at times. The urge to try out something new is always on my mind and I can't help it but to constantly surf around for new recipes to whip up in the kitchen.

Though I have yet to satisfy any cravings (well, I am a potato chip junkie so I can always buy my favourite Calbee Hot and Spicy chips off the shelf), it still brings great satisfaction seeing the food I try out turn out successful and well, platable.

I made it a Japanese themed week as I tried out Tonkatsu chicken with japanese curry, chawanmushi as well as green tea ice-cream with red bean paste. Of course with the Tonkatsu chicken and chawanmushi recipes taken from ruth's website :) Her zeal for cooking and her clear instructions make her blog a definite visit for me everytime I go online!
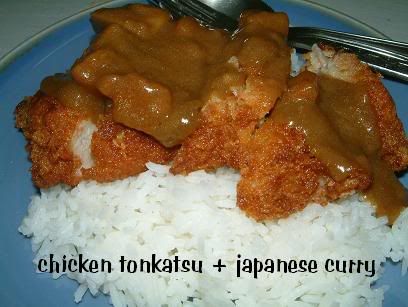

CHICKEN TONKATSU (adapted from ruth)

Ingredients:
1 cup of Panko (leftovers from what I bought from a Japanese supermarket and its different from tempura flour)

1 egg, beaten

3/4 to 1 cup of flour (I used leftover self raising flour from my muffins) and I think 3/4 cup of flour would be sufficient as there was lots of leftover when I used 1 cup.

2 boneless chicken thigh meat (as the pieces were too big, I cut them into 4 pieces)

Directions:
1) Season the meat with salt and pepper (me, having not seasoned anything before.. I added about 5 dashes of pepper and 2 dashes of salt and it tasted pretty ok)

2) Cover the meat in flour, dredge it in egg and cover the meat in panko in this order, ensuring that all parts of the meat is covered (and as ruth suggested to have a production line with these 3 ingredients lined up together so it facilitates the meat to go from flour to egg to panko easily)

3) Refrigerate for an hour (this is to allow the breaded layer to stiffen and stick to the meat)

4) Heat up the oil and wait for the oil to be ready (well, I used a dangerous method of placing my arm over the oil to see if its hot enough :) but for ruth she waited till she saw small bubbles rising and waited for another minute) and deep fry meat till golden brown

5) I also steamed hot a packet of ready mix golden curry for about 5 minutes and poured it on top of the chicken before serving
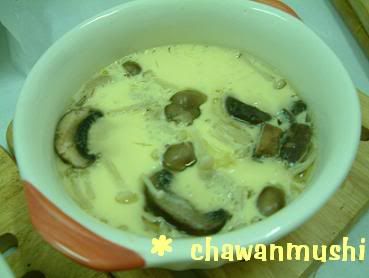

CHAWANMUSHI (adapted from ruth)

Ingredients:
2 eggs, beaten

3/4 to 1 cup chicken stock (well, I used chicken soup that my mum was boiling) If you like your chawanmushi watery, 1 cup of stock will be nice but if you prefer it less watery, you can try 3/4 cup

1 tbsp sake (but I used chinese wine from my mum's kitchen)

1/2 tbsp soya sauce

1/4 - 1/2 tbsp sugar (I found 1/2 tbsp sugar a bit too sweet so I guess 1/4 should be just right)

I added some mixed mushrooms I found from the supermarket

Directions:
1) Mix all the ingredients together and pour into container but do not cover the container as it allows the chawanmushi to set and cook faster

2) Boil water in steamer till very hot and lower the chawanmushi into the steamer and put the fire to low to allow egg to set smoothly

3) I steamed my chawanmushi for a good whole 30 mins

GREEN TEA ICE CREAM WITH RED BEAN PASTE
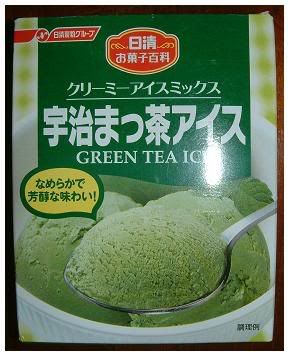
Well, I found this at Medi-ya a few weeks ago and the picture was just so tempting! Though the actual ice cream I made out didn't look that presentable (well, thats why I didn't put up any pictures), it tasted rich and milky and really really nice!! I bought a packet of ready made red bean paste found at Medi-ya as well and it complemented the green tea ice cream!!

Though the instructions were in Japanese, I could sort of decipher the ingredients as well as the proportions by looking at their pictures behind the package :)

Directions:

1) 1 egg yolk beaten

2) 3/4 cup milk

3) Add the green tea mix and mix well till all dissolved and freeze for about 3 hours

Labels: , ,